
These peel and stick tiles are so great because they make for an easy install over linoleum because the base is already smooth.
Materials I Used to Install Vinyl Planks
*Clicking on hyperlinks may result in a commission for More to Mrs. E

Level - Mostly for measurements and having a straight edge to score the tiles. A yard stick would do too!
Large Bowl / Sponge / Scrub Brush - For scrubbing the floors before install.
Scissors - To cut the planks when it's not a straight cut.
Tape Measure - To measure length of gaps and boards.
Pencil - To mark where to score on the vinyl planks.
Utility Knife - To score the vinyl peel and stick flooring planks
Contour Gauge - To make complicated cuts around door frames or toilet bowls easier.
Style Selections Peel-and-Stick Vinyl Wood Planks in Golden Oak
Caulk - to seal edges from moisture. I actually used a brown indoor/outdoor sealant to match my floors.
How to Install Adhesive Vinyl Floor Tiles over Linoleum
1. First of all, I removed anything that was on the floor and vacuumed the bathroom. Make sure to get under any bathroom vanity or baseboard heater as you will need to apply adhesive tiles under those areas and you don't want dust to get in the way of the tiles sticking properly.
2. If you have baseboards, remove them. As I don't have any baseboards, I moved on to the next step.
3. Next I inspected the floors to see if there were any spots where the flooring was coming up. I used my utility knife to cut away loose edges (mostly in the corners where the laminate was starting to come up). Ideally you would want to then fill in those gaps in the floor with leveling compound but since this is only to tide us over for a few years until we do a big bathroom remodel, I decided to just see how it worked without filling in the holes.
4. Clean the floor. I used dish soap, my scrub brush and sponge, the same as I used for the last step I shared in this project. Then I let the floors dry 15 minutes.
5. To get started laying the vinyl planks, I measured the width of the bathroom with my tape measure at 3 points and marked the middle point with a sharpie. Then I drew a line down the middle, connecting each of the dots to make the first line I would use to lay down the tiles.
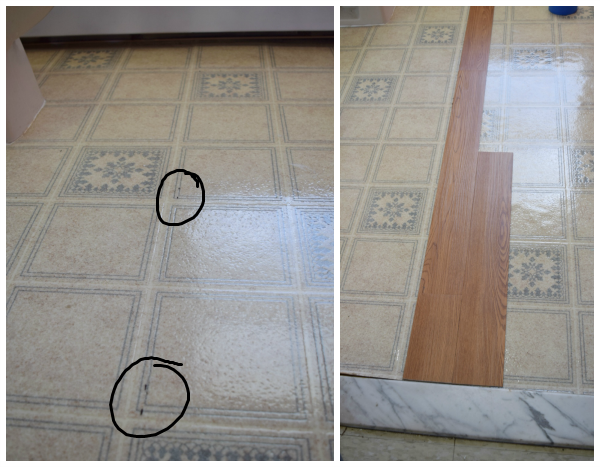
6. Use the directions on the box the planks came in to install the vinyl planks. In general, you remove the adhesive backing and press the tile onto the clean floor. (Some advise applying a floor adhesive first. I did not do this step and they still adhered fine but I would recommend this step if you want your floors to last longer than a few years.) I made sure to apply pressure with my knees and hands to the whole plank. Each plank has arrows on the back to show you the direction of the wood grain. Make sure each plank has the arrows going in the same direction.
The first plank is the easiest to install as you simply line the tile up on the line you drew and press it down firmly. I was lucky because my line matched up with the lines already on our linoleum flooring.
The next few planks are trickier. You want to push the end of next plank in to the end of the plank that is already adhered to the floor so that it makes a tight fit. Then, while it's being pushed tight, flatten the rest of the board to the floor. Here is the part that took me a few tiles to learn:
To make the best fit, only push uncut ends up against each other. If you have to cut a board (which you will have to do), do not try to push the cut end up against an uncut end. No matter how hard you try, there will be a gap. Leave the cut ends for the outside walls.
Lay the vinyl plants uncut end to uncut end until you get to the end of a row where the gap is shorter than the plank.

7. Cut planks to fit the gap (more specifics below). There was a learning curve to this step as well. Overall you will mark your measurement on your board with your pencil. Then, use a straight edge (I used my level) to connect the two marks and score a straight line between them using your utility knife. Then, fold it in so that the plank snaps along the line that you scored.
But to ensure the best fit possible, you want the cut, uneven ends to be close to the wall where it will be covered with baseboard or filled with caulk. See below for more specific instructions.
8. Continue to install row after row of vinyl tile, staggering the planks so they are not the same size side by side, using your contour gauge to install around strangely shaped edges (more instructions below) until you have completed the entire floor.
9. Reinstall baseboards, or caulk the edges along the wall to seal the gaps and cover the uncut edges.
How to Cut Planks So There Are No Gaps:
1. Measure the distance between the end of the last board you installed and where it will hit the wall or door jam. Make sure to leave a tiny bit of clearance at the end so that it fits into the space.2. Lay the new full plank on the floor next to where it will be installed and make sure the arrows on the back are going in the same direction as the rest of the floor. Here's where it gets tricky! Take the measurement you got of the gap and transfer it to the plank. CAUTION! Start measuring from the FLAT end of the plank to the side you won't see. This makes it so you can connect two uncut ends and leave the cut end against the wall. (see below)

3. Take the cut plank that fits your gap and install it the same way you did with full planks, pushing the flat edge to the flat edge of the board already attached to the floor.
4. The rest of the board you will use for either the top or bottom of another line of planks because you need to keep it going the same direction and you don't want to try to push a cut end to a flat end because it will leave a gap. (In my picture above, the rest of that board will become the BOTTOM of a new row since the cut end is at the bottom).
Sometimes it's easy because you can start the next line of vinyl planks with your cut end. Other times it may end up being the same length as the one next to it and you may have to wait for another line of planks before you can use it.
How to Cut Vinyl Tile Around Odd Angles:
The process of laying the vinyl flooring goes very quickly until you get to something like a door frame or the base of a toilet (ideally you could remove a toilet but if you're like us, your toilet simply won't let you remove it...). This is where a contour gauge comes in very handy because it takes the shape of your object and lets you transfer that shape to your plank.Press the contour gauge flat into the spot you want to capture. For tiles, I lay my tile next to it so I can then measure the distance from the end of the contour gauge to the edge of the tile. Measure that distance directly on the tile and then place the contour gauge on the tile and trace the shape that you need to cut.
Cut the shape out with your scissors since it is not just a flat line you can "snap". Check the fit. Sometimes you need to trim more off and check the fit a few times before it is the perfect fit and you can remove the backing and press the tile down onto the floor.

That's it friends, how to apply Peel-and-Stick vinyl tile to transform your bathroom! I am very happy about how it turned out and my husband is too.

See Part 1 and Part 2 of this series to see where we came from and how I transformed this bathroom. What do you think? Worth the time it took to transform it? Let me know in the comments below!

Grab this for your Pinterest Board!
Thanks for stopping by!
No comments:
Post a Comment